
My Ostomy Appliance Change Routine
Disclaimer: This information is based on my own personal experience since my ostomy surgery in August 2016 and is not intended to replace medical advice from a trained professional. If you are requiring advice regarding your own stoma, routines which might benefit you most, or products that suit your needs best, please contact your stoma care nurse for further assistance.
I’ve had my ostomy for six months now. And throughout that time, I’ve been getting used to and getting more comfortable with changing my appliance.
From the first couple of days that my ostomy existed, I was on TPN and hooked up to my feed for the majority of the time. I would have my stoma nurse come and change my bag every two days. But as I got moved off the TPN and onto solid food, she expected me to change my bag myself. I would do this, of course, it was part of the process of accepting my ostomy as well as part of being able to be discharged. I admit; I hated doing it in those early days because I was so so so tired. I was weak from not eating anything for weeks prior to surgery and physically having surgery and healing from that was giving me little to no energy. I also would find out I would need some ‘force’ in order to clean my skin, which in those days was a big feat.
Nowadays, I have a good, strong routine for changing my bag, which I’m going to share below. I also provide the links for the products I use in my normal set up. Please remember, this is what works for me, this may not work for you. The key to getting used to an ostomy is to not be too scared to try something new; this is easier said than done, I respect that.
- I change my bag every two days, usually in the morning when my stoma is less active. I have an ileostomy so my output is more liquid than solid so I find my baseplate can last between 48-72hrs, but this depends on what I’ve eaten and how well I feel.
- I prepare my supplies the night before: I get my new bag out, wash my hands. I take my template – the plastic backing from my last bag – as a guide and draw the outline on my new bag backing. I then cut this out with my special scissors: They are curved and do not damage the ostomy bag when I cut through.
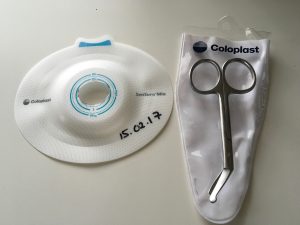
- I then make sure I have my other products to hand for when I come to change.
- In the morning of my change, I empty my bag from my overnight output. I get a small container and fill it half full with warm water. This is on hand to help me clean my skin. I find this most useful when I’ve had abit of a leak and need to wipe my output from off my abdomen.
- I get all my supplies:
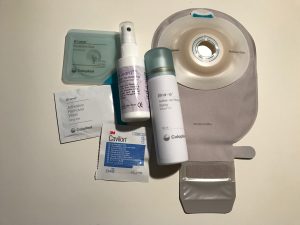
- I then lie on my bed. Put my supplies to my right hand side and tuck a couple of my dry wipes – provided for me from my supplier as a complimentary item; they do not leave fibres behind on my skin nor irritate it – into my underwear waistband. This helps catch anything that leaks out and protects my clothes.
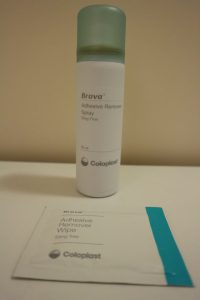
- Using my adhesive remover, I pull the tab at the top of my bag away slightly and spray my remover to get the bag off my skin. You of course don’t have to use remover, but I find it easier and gentler on my skin. It is also great at removing any residue left from plasters or what not, fab tip!
- NB: This stage you don’t have to do but I tend to take a photo of my stoma and the used baseplate. This is for my ‘records’ and if I ever have issues with my skin or stoma, I can sent this picture to my nurse. More on why on that later.
- Using a dry wipe, I wet it and remove all the output from my skin, and make sure my skin is clear. I also use a adhesive remover wipe here; this removes the ring out the outside of my bag from my skin; when I wear dark clothing I find fibre stick to the edge. I just like to make sure my skin is completely clear.
- I now use a no sting barrier product – wipe or spray – to wipe over the skin I know will be under my baseplate. I pay attention to the very edge of my stoma.

- I let this dry for a couple of moments. At this point, I usually warm up the baseplate of my bag. Because its been quite cold lately, this is important to help get the maximum adhesion between my skin and the bag. I place it under my arm or on my chest, just for a few minutes.
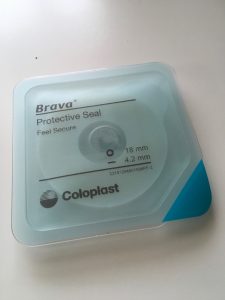
- I now apply my seal to my stoma. I apply directly to my skin, after I’ve moulded it to fit.
- I then apply my bag straight on top.
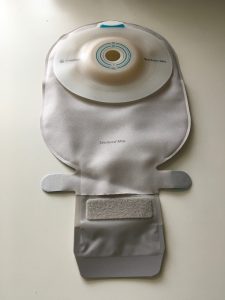
- I make sure at this point that I hold my bag edges down and rub them slightly to make sure they have all stuck to my skin. This is important around the bottom I find, because of the shape of my abdomen. I hold my bag like this for a minute or so. This helps keep it all warm and stick.
- Then I roll up the end of my bag, fold in the flaps and tuck in to the bag.
- If you struggle with pancaking, here I add a sticker to the filter on my bag – inside on the top of the inspection window on my bag but consult your own bag manufactuer if different – to help keep abit of air in my bag to help the output slide down to the end of my bag.
- All of my used wipes and rubbish get collected into my disposable nappy bag and thrown into the general rubbish bin provided at my house. If out in public, all your waste can go into the usual bin or the sanitary bin provided in female toilets.
Things to note:
- Taking photos of my stoma: This is a tip I picked up off VeganOstomy when I was first in hospital after surgery. This helped me track changes in my stoma shape, size and my skin. I suffered with quite abit of peristomal rash in the early days so me and my stoma nurse would email about it, photos became very helpful to show her what was going on. I’ve also kept this going so I can better understand what causes more breakdown of my seal and baseplate. Yep, I am a weirdo.
- I use the Ostobuddy app to help keep track of my supplies. In this app you can schedule changes, add your supplies and tick off what you use on what change. It has been great at helping me remember to reorder when I my supplies are low too, as you can set ‘low supply’ levels of individual items. Available for both Android and iPhone here.
- With regards to my template: I use the one left over from whenever I see my stoma nurse; because I know its always been checked by her and its recent. We always date them too. About every two weeks or so I check my own template on my stoma to see if anything has changed. Changes to the stoma usually happen right after surgery but now its more down to body shape from (needed) weight gain. It’s a good thing to check; you can cut your template too big or too small resulting in leaks and skin irritation.
- When it comes to using my seal, you can always apply this to the bag directly, then to your skin. I use my seal to help protect my skin and to help aid my stoma stand up and away from my skin: I have a telescoping stoma which means it wiggles around and sort of ‘flops’ up which means my output always gathers at the top of my bag.
- This is always way I use a convex bag. It pushes the base of my stoma upright, helping with the fall of my output into my bag.
- These are the products I use on every bag change. I also use a Convetec Orahesive Powder if I have a rash around my stoma to help protect my skin from my output and provide a barrier. That works quite well, but I also have Coloplast Brava Powder which does the same job.
- There are lots of No Sting Barrier products out there. Most ostomy companies have them. This OstoGuard one had added lavender oil which I particularly like. If you do use one, its worth getting samples of these products from the companies so you can experiment, if you wish.
- Below are the products I use; all with links to ordering samples:
- Coloplast Sensura Mio Convex Midi 1-Piece drainable (16622: Light Convex 15-33mm Starter hole Midi Neutral Grey) – available in two piece*, different strengths of convexity – soft light and deep (increasing in convexity) and stoma sizes starter hole (10-23, 15-33, 31-43mm) or pre-cute (25,28,31,35mm). Full list of variants here.
- Coloplast Brava Protective Seal (12045: 18mm 4.2mm) – available in three diameters – 18, 27 and 34mm – and two thicknesses – 2.5 and 4.2mm
- Coloplast Brava Adhesive Remover Wipe (12011 – Remover Wipe, box of 30)
- Coloplast Brava Adhesive Remover Spray (12010: 50ml)
- OstoGUARD No Sting Barrier Film (RMC5: 50ml Spray and RMC3: Wipe, box of 30)
*Two-piece versions:
Click (mechanical coupling) Sensura Mio Convex Click baseplate and the accompanying Sensura Mio Click pouch
Flex (adhesive coupling) Sensura Mio Convex Flex baseplate and the accompanying Sensura Mio Flex pouch
***
I hope this has been useful to see what I use and how I change my ostomy. As always, any questions, queries or feedback, feel free to leave a comment or find me on social media (links to the right, top corner)



3 Comments
Jenne
20/02/2017 at 14:07
Hey there Louise! This might be weird, but my name is Jenne. I am the person who retweeted your blog post just a while ago 🙂
I’m leaving a comment just to tell you how helpful you are. This was my first encounter with your blog, but reading it is just amazing. I meet very little patients who have the courage and time to write about their illness and how they deal with it – you are an exception!
I am a medical graduate, and I have to say that we learn the most from patients. When we do not see patients with a specific disease, I would say the learning declines. Reading from textbook doesn’t really pin the information into our brains, talking to a patient / knowing a patient’s routine does! (And that’s the feeling I have after reading about your post)
Keep writing what you’re writing, it taught me a lot today, and I think it will teach a lot of others soon! Take care and have a good day.
Ostomy Uncovered – How to Resize Your Baseplate •
11/01/2021 at 16:26
[…] once when I was quite new to it and one more recently when I had a new routine. You can read them here and […]
Updated: My Ostomy Appliance Change Routine •
31/03/2021 at 15:27
[…] is my previous post on my change […]