

Updated: My Ostomy Appliance Change Routine
Disclaimer: This information is based on my own personal experience since my ostomy surgery in August 2016 and is not intended to replace medical advice from a trained professional. If you are requiring advice regarding your own stoma, routines which might benefit you most, or products that suit your needs best, please contact your stoma care nurse for further assistance.
It’s been a whole year since I shared my stoma bag change routine. I wish I felt more comfortable to actually show it in a video, but alas, I’m not quite there yet. You’d see it only take a maximum of five minutes on a good day – when the stoma is inactive and I don’t have a peristomal rash.
So what has happened in the last twelve months?
A few things actually;
- I moved for my current job, so I had to organise myself into a new stoma changing routine.
- I gained bit of weight, lost some and then gained it back. These fluctuations in weight, especially around my middle where my weight gain tends to go, ugh; have meant some adaptations at times.
- My peristome dip is more noticeable and I’ve got some upper muscle weakness, both of which have been causing some issues.
Having said all that, for the majority of the time – 85% of the time, give or take – my stoma has behaved well and performed as expected. But, it is the other 15% of the time that I am choosing to talk about, share my thoughts and experiences on; hopefully helping where it can. I know I’ve learnt a lot, so I am hoping other can do so too.
Here is my previous post on my change routine.
Currently, my stoma supplies sit in a plastic wicker basket on my chest of drawers. This is what I like to have to hand for my usual change and a few miscellaneous products. It contains the following:
- Mirror
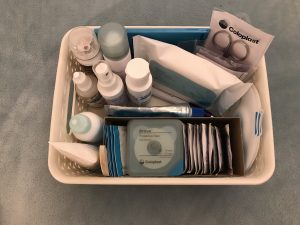
- Ostomy scissors
- Ostopeel Blackberry Remover spray
- Brava Adhesive Remover spray
- Ostomist Gardenia drops
- Ostoguard Barrier spray
- Convatec Orahesive powder
- Brava Skin Cleanser
- Bag templates
- Convatec Stomahesive paste
- Brava Ostomy powder
- Brava Barrier cream
- Astoa Small Flange extenders
- Brava Adhesive remover wipe
- Brava Protective Seal
- Ostoguard Barrier wipes
I use six of these products on every single change that I do. I still change every other day, usually in the morning before my breakfast.
Let’s go through the routine, step by step.
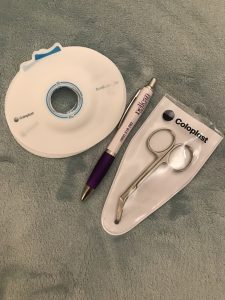
- I usually cut my bag from my most recently template, the evening before my bag change is due. This is now habit but it helped me remember that my change was due. It also means that it’s already done when I get up. It gives me time to cut my bag to the correct size. I always cut each bag, before use. I never pre-cut any bags in bulk or get these cut by my delivery company. I find that this gives me the control as my stoma has changed in the last couple of months, and it means I don’t have boxes and boxes of my bags wasted when the cutting instruction is no longer current.
I always keep the last three templates, so I can see the subtle changes in my stoma size. And yes, a subtle change can mean leaks and sore skins; two things I want to avoid as much as possible! I always use my stoma scissors too. I have one at home, one in my emergency kit and one at my parents house too. This means, wherever I might be, I can cut a bag to my size if a disaster happens. Over time, these scissors do dull, and you can request a new pair from your delivery company.
- I use the Brava Adhesive Remover Spray 9 times out of 10. The Ostopeel has a very strong scent which is very good
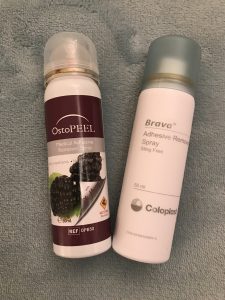 when it comes to changing a bag which has quite a strong odour – see: eating fish, garlic, too much cheese or just a lot of spicy food. The Brava spray is the only one I’ve found to give me an even coverage, has a strong enough nozzle and actually removes the bag without too much pull. Ostopeel works well too, but can sometimes come out too fast as the nozzle is hard to use at the beginning.
NB: I tend to pull my ostomy bag tab gently away from my skin, then do two short sprays to help the top of the bag come away. Wait a couple of beats, then pull and spray across, in little pumps. If you use flange extenders or additions boarders, remember that you might need to loosen them first before removing your bag!
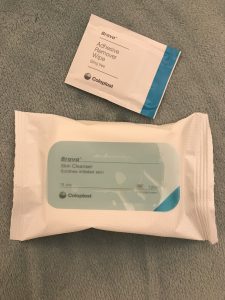
- I always use an adhesive remover wipe too. It might be over kill in some people’s eyes but I find this is the what works best to get those stubborn marks from around the end of the baseplate – see: if you wear dark clothing, you get rub marks on your skin which are easiest to remove when changing your bag. I also find that a wipe will get into the dips and crevices around my actually stoma. Big thumbs up!
- I then also use the Brava Skin Cleanser. I use this instead of wet wipes or dampened dry wipes. It mostly helps with keeping my peristomal skin clean and free from anything that might interact with my products / bag, but it also helps keep the skin around the edge of my baseplate moisturised. This was helpful during the very cold winter months.
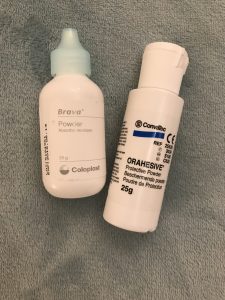 Two products I use when I have bad peristomal skin are these: Convatec Orahesive Powder and Brava Powder. I usually use the Orahesive powder because I know how well my skin responds to using this product. I’ve been using it on and off since late in 2016 and have yet to run out of my first bottle! This is used sparingly, in a thin layer over my sore skin, whenever that might be around my stoma. The powder helps dry the wet and moist skin, and protects it from further damage from my output. This usually happens when my bag has been cut too big – even by just one mm, it makes a difference! – or my seal hasn’t been put on correctly. Sometimes it happens when my output is just too much, too watery and my baseplate and seal just dissolve before my usual change time. The Orahseive powder has saved my skin many many times before, and it continues to blow me away.
NB: Things to note – I only use the powder when necessary. I do not use this every change, I assess that when I remove my bag and check my skin. You need to use it sparingly and in a thin layer. Too much in an area can cause granulation of your skin and stoma. I apply over the top of my dried barrier film / spray so that my skin has added protection. Also, there are so so so many varieties of ostomy powder out there, please speak to a SCN about peristomal skin issues and see what is best suited to your skin and needs. They will also advise you on the best way to apply the product/s too.
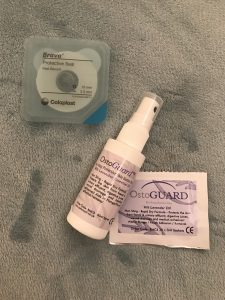 Now I prepare my skin for the new stoma bag. My bag is cut and my skin is clean. I apply my barrier film – it has almost always been Ostoguard No Sting Protective Barrier Film, but lately I’ve gone back to the pump spray over the wipes, just because I get more product applied this way. I keep my wipes for travelling. I have also use the Brava Skin Barrier Spray, the Cavalier pump spray in the past but I just prefer the scent off the Ostoguard. It never stings – yay – and it protects very well.
- At this point, I also get my Brava Protective Seal ready too. I need to mould it to fit my stoma. I apply directly to my skin, not to the bag because I can get it off and remould if needs be. Once the barrier spray is dry – this takes a couple of moments, a minute proably – I then add on my protective seal. I always make sure my seal is as close as possible to my stoma, without contricting it from functioning. I have a telescoping stoma, which means it widens at the base as it products output and then relaxes into something smaller. I have to ensure a snug fit to avoid peristomal soreness and also making sure my bag is snug too.
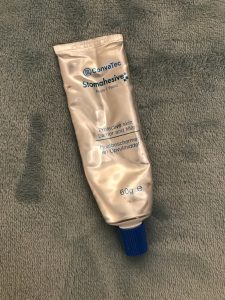 What is new this time around, is the use of stoma paste. Paste is used to fill in dips and even out the peristomal skin. I have a dip which was caused from the stitching after my operation, but as I’ve gained bit of weight, has caused quite a few leaks. I initially was hesitate to add a new product into my routine because I wanted to keep it simple but after trying a couple of other things, I knew that my dip needed some filler to help stop the leaks. I was originally applying the paste directly to my skin in a very small amount, but that didn’t solve all the leaks. So after a review with my SCN, she advised applying it directly to the bag and to use more around the dip area, for added protection. And since then – roughly a month now – I’ve had very few leaks and I feel very comfortable with using it.
- I use the Stomahesive paste as this came from a personal recommendation. It has alcohol in it, so it’s pliable and my skin does not react to it. Applying it directly to the bag, so that it sits between the seal and bag, means I also don’t get the additional fuss of trying to get the paste off my skin with my remover wipe and / or skin cleanser. Added bonus!
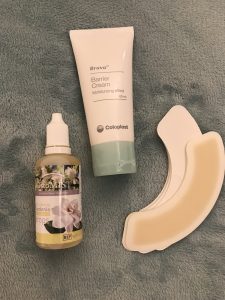
- And these are the things that I use on a very very occasional basis: [left to right] a) Ostomist Gardenia drops b) Brava Barrier Cream and c) Astoa Small Flange Extenders. I probably use the extenders most out of the three, but the other two are used very occasionally. The Barrier Cream has saved my skin in the winter and it also helps during the summer when the prickly heat gets to my skin. Its helpful when you need some relief from the itchy feeling but you know its not underneath your bag. The drops I’ve used once, when using my two piece version of my bag to help with the smell. I had a spell over Christmas were food was producing some quite strong songs and this helped a lot when I was emptying and almost retching. The extenders are very thin and cover approx 1/3 of my baseplate in one go, and help me feel secure if my bag is just leaking abit, hours before my change is due.
Below are the products I use; all with links to ordering samples:
- Coloplast Sensura Mio Convex Midi 1-Piece drainable (16622: Light Convex 15-33mm Starter hole Midi Neutral Grey) – available in two piece, different strengths of convexity – soft light and deep (increasing in convexity) and stoma sizes starter hole (10-23, 15-33, 31-43mm) or pre-cute (25,28,31,35mm). Full list of variants here.
- Coloplast Brava Protective Seal (12045: 18mm 4.2mm) – available in three diameters – 18, 27 and 34mm – and two thicknesses – 2.5 and 4.2mm
- Coloplast Brava Adhesive Remover Wipe (12011 – Remover Wipe, box of 30)
- Coloplast Brava Adhesive Remover Spray (12010: 50ml)
- OstoGUARD No Sting Barrier Film (RMC5: 50ml Spray and RMC3: Wipe, box of 30)
- ConvaTec Orahesive Powder (25535: 25g bottle)
- ConvaTec Stomahesive Paste (S105: 60g tube)
- OstoMIST In Pouch Odour Neutralising Drops – Gardenia with Jasmine (GJN50: 50ml)
- Coloplast Brava Barrier Cream (1200: 60ml)
- Astoa Adhesive Flange Extenders (Small: AFES30, pack of 30)
How do you find your routine? Is it comfortable and easy? Do you find it changes often, but you adapt?
Do you have any questions or queries? Or just want to share your own experiences? Leave me a reply or tweet me @sapphire20 or find my blog page on Facebook!


1 Comments
Ostomy Uncovered – How to Resize Your Baseplate •
11/01/2021 at 16:27
[…] I have never written about sizing my stoma bag alone before. However, I have written about my experiences on changing – once when I was quite new to it and one more recently when I had a new routine. You can read them here and here. […]